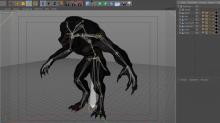
This is a complete description of a workflow to import fully rigged Xnalara-models into Cinema4D.
What you need:
- Cinema4d (of course)
- any rigged Xnalara-model (you will know where to get them...)
- Blender (www.blender.org)
- Blender-Xnalara import script (www27.zippyshare.com/v/27747054/file.html)
- 3D Object Converter (3doc.i3dconverter.com)
- DDS Converter (www.ddsconverter.com)
- c4d mtl import-script (www.c4d-jack.de/site/en/downloads/cat_view/82-python-skripte.html)
1. Install all software
All software comes with appropriate installers. If you don´t know how to do this, you should not consider dealing with complex 3D-data.
Put the python-import script into programms/blenderfoundation/blender/version-nr#/scripts/addons
2. Convert via Blender
Start Blender and in /user-preferences/addons/import-export/ activate the script "Import XNALara Extended Mesh".
Then import the model via /file/import/XNALara
If you like, delete the blender camera, light and default cube.
Export via file/export/autodesk_fbx and save the converted model. This is already readable by C4D.
3. Import in C4D
Simply open the fbx-file in Cinema4D. There you are! In most cases you will find the complete bone-rigg as an object "armature".
Next you should create a new null and put all other objects into it. (group all objects) Rename this null to represent your model. Copy this model, create a new scene and paste it. This will get rid of any scaling problems while using the fbx import-dialogue.
4. Retexture the model
Unfortunately this import way works without textures. Fortunately all necessary information like polygon-groups and uv-coordinates are still there.
Explore the folder from which you got the xnalara-model. There you will find all necessary textures. Most game-rips come with dds-files which will not be recognized by c4d.
So start the DDS-converter and load all the files. Convert them to png to keep any embedded alpha-channels.
If you are smart you can now try and find out which texture belongs to which object. As this will be a lengthy process i suggest a workaround.
Start the 3Dobject converter and /file/batch convert/. Add the Xnalara models generic.mesh.ascii file. For export format choose wavefront.obj down in the list and hit convert. This will take a short while.
Simply opening the obj in Cinem4D will not help, as it will not read the .mtl file which assigns the textures.
Here you have two possibilities: you can install the demo-version of the riptide-pro plugin which will work 30 days for free, or you use the freeware mtl-import-script.
In C4D, open the Script manager (from the "Script" menu) and import the .py. After that, it will be available from the User Scripts menu.
So basically you open the .obj file you created earlier and then run the script. It will, similar to the riptide-plugin, assign most of the textures to their materials. In most cases only the color-channel. After that it is just a matter of manually checking every material and from the filename in the color-channel you can then assign the other channels like normals and specular.
When all is done, your model should be fully textured and look quite nice. But this is just the unrigged obj-model.
5. Copy materials to the fully rigged model
At this point you can simply copy this textured model over to the rigged fbx-version so that you have both models in one scene. Now you can copy the materials from the unrigged obj-version to the rigged fbx-version. In most cases the order of all objects will be backwards. Check by object-names.
The materials from the obj-version are assigned to special selections. As the fbx-version does not have those selections, simply delete them in the mapping-dialogue and everything should look fine. Afterwards you can delete the obj-object and you are left with a fully textured, fully rigged C4D model. Be happy!
6. Cleanup
In some cases you will end up with bone-riggs having too many bones/joints. Most of them will be named "unused". But beware - do not simply delete those. Some of them are actually very important. If you plan to use inverse-kinematics you should keep the last "unused" bone/joint at the end of each bone-chain. These will be the controllers for the ik. Especially in any hair-area you will find a good many "unused" bones that are used nonetheless.
Basically you should grab some higher bone and move it. If all the model-parts move with it, you are fine. Then delete the "unused" ones and keep checking if the model still moves along. If at any point you get strange results on bone-movement, like parts of the model being distorted, you should undo until everythings works as expected again. Browse the whole model and get rid of any unwanted and really unused bones.
In the end you will have a complete working model in C4D.
- Update -
I have found another method that may be a little easier.
Instead of using the python import script for blender you can download the XPS tools here.
www.mediafire.com/download/p1zufffqmy5v5z0/XNALaraMesh(1.1).zip
Do not unzip the package. In Blender go to file/user preferences/. At the bottom of the /Addons/ tab you find the button to "install from file". Browse to the xps-tools zip and install. After enabling you find a new tools palette at the most left tab "XPS".
There you can import the mesh.ascii models. This method works a bit better than the import-script as it loads the appropriate textures and makes the reassignment in C4D a bit simpler. Also it could load bones that the other import-script did not load. So if you are missing bones in your model after using the import-script, simply try this XPS-Tools and check if it works better.
